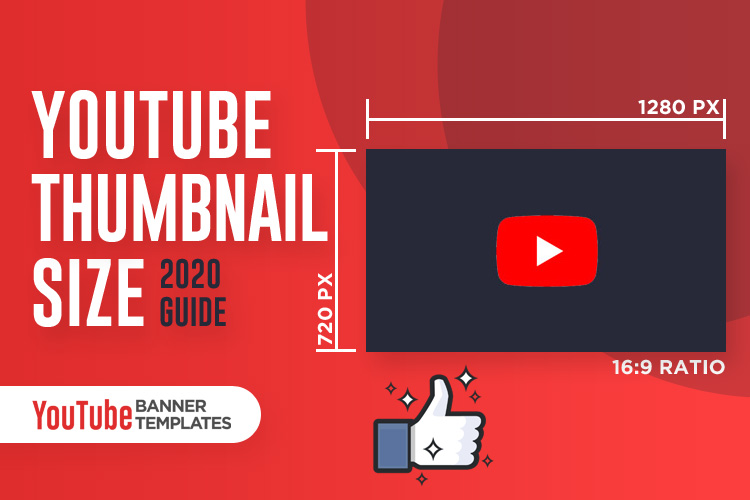
The best YouTube thumbnail size is 1280 x 720 pixels (width x height), with a minimum width of 640 pixels. The thumbnail image format should be .JPG, .BMP, .GIF, or .PNG. Recommended ratio 16:9 as it’s the most used in YouTube players and previews.
Thumbnails are important! This are the first thing viewer see when they browse videos. According to YouTube “90% of the best performing videos on YouTube have custom thumbnails“. YouTube thumbnail helps you to improve CTR (Click Through Rate) to increase views for your videos.
What is a YouTube Thumbnail?
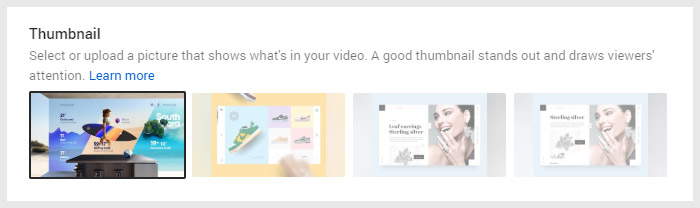
YouTube thumbnail is a cover or preview image of any video uploaded to YouTube. When you upload a video, YouTube generates thumbnails from your video and gives you 4 options to choose one.
A Quick Guide for YouTube Thumbnail Size(s)
Having eye-catchy thumbnails is key in getting views regularly on videos but this is one of the most critical things after creating a YouTube channel.
Quick Navigation – What you’ll learn in this guide:
- The Perfect YouTube Thumbnail Dimensions
- How to Enable Custom Thumbnails Feature
- How to Make a YouTube Thumbnail
- How to Upload a Custom Thumbnail on YouTube
We’ll go through each point in detail. Let’s start with the basics:
Best YouTube Thumbnail Dimensions – Everything You Need to Know
This is the most common question; what are the best YouTube thumbnail size?
Here is the answer:
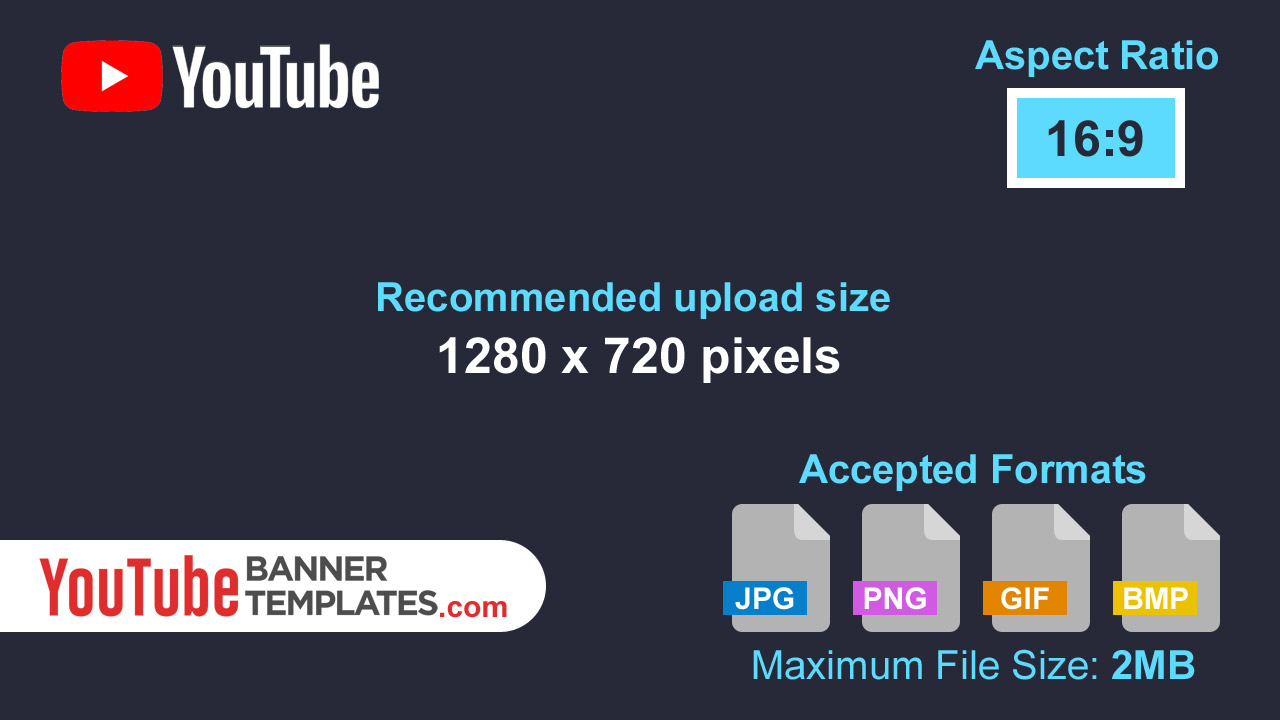
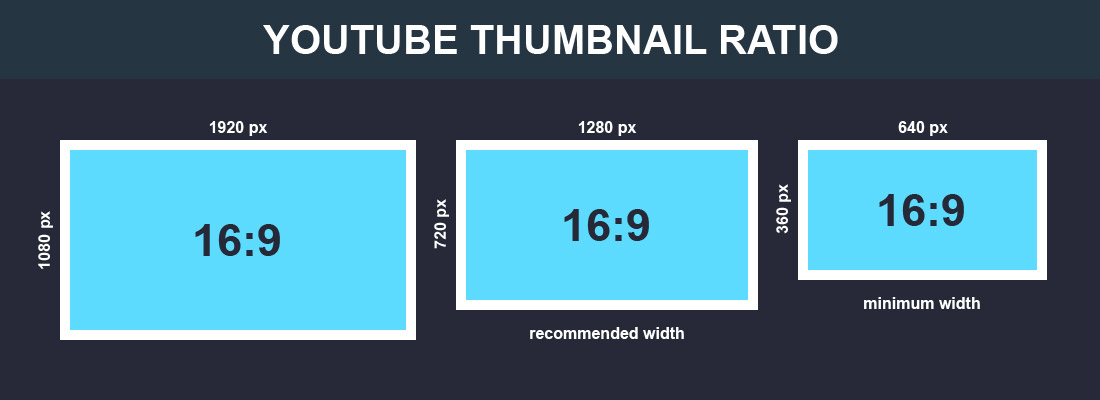
The perfect YouTube thumbnail size is 1280 x 720 px (width x height), with a minimum width of 640 pixels. The aspect ratio is 16:9. Make sure the thumbnail file doesn’t increase the size of 2MB and the best file format to upload is .JPEG, .PNG, .BMP or .GIF.
These sizes recommended by YouTube, so make sure your custom thumbnail follows these guidelines.
Here’s the summary of YouTube Thumbnail Size and Requirements:
- Thumbnail Size: 1280 x 720 pixels
- Minimum Width: 640 pixels
- Thumbnail File size: 2MB maximum
- Aspect Ratio: 16:9
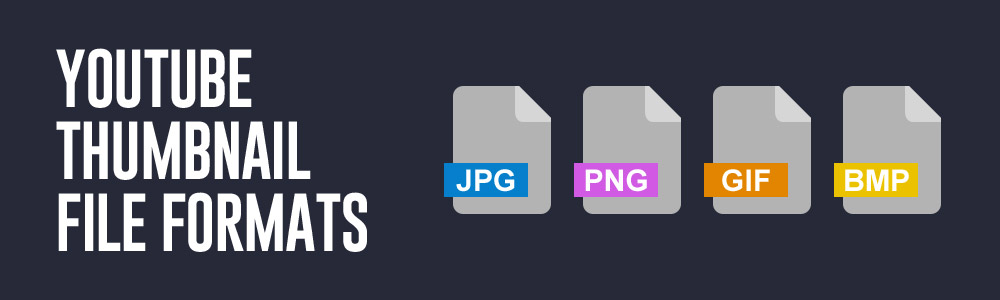
- File Type: .JPEG, .PNG, .BMP or .GIF
Above is a list of the technical requirement (you need to know what they mean) if you are planning to create a custom thumbnail image for your YouTube videos.
YouTube thumbnail resolution
The perfect resolution required for the thumbnails image is 1280 x 720 pixels. The image resolution corresponds to the number of pixels contained per inch and is expressed in DPI (dot per inch). Generally, the images we use on the web contained 72 pixels/inch.
The higher numbers of pixels create better high-quality images but it also increases the file size. If the resolution is low, the image will look pixelated and may less in file size. For this reason, you need a high-resolution image that won’t look blurred when you scaled up.
Minimum thumbnail width
The minimum recommended width is 640 pixels for the YouTube thumbnail image. At the time of creating a custom thumbnail image, this is the smallest canvas size you have to use. An image lower than 640 pixels cannot be acceptable for a video thumbnail on YouTube.
Maximum File Size Limit
The maximum YouTube thumbnail image file size is 2MB. YouTube set a file size upload limit to load faster in the web browser or mobile app. YouTube doesn’t accept or upload the image if the file size is more than 2MB.
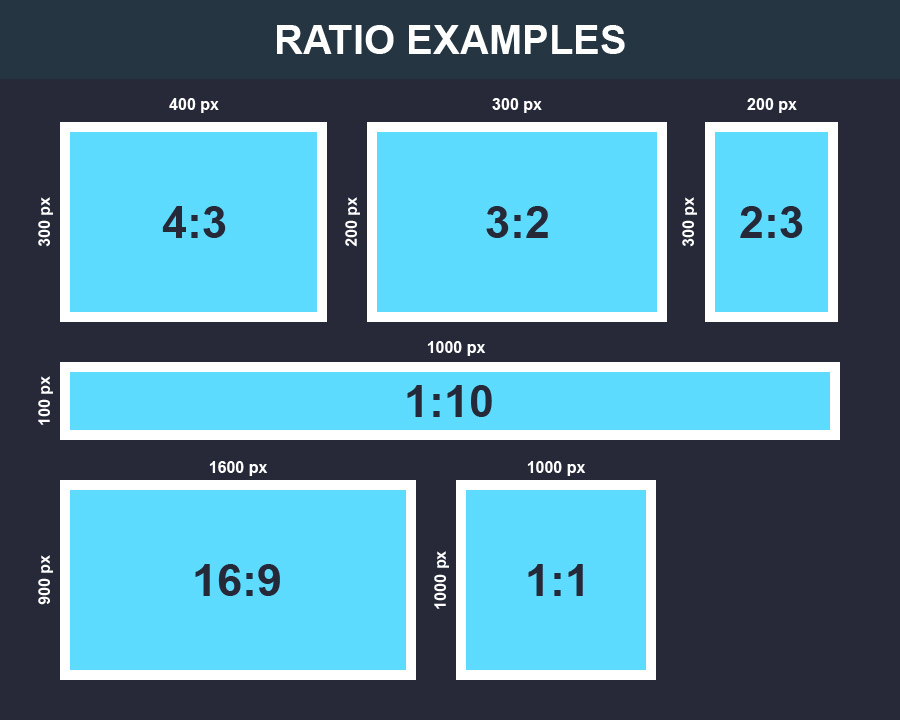
Aspect Ratio
The thumbnail image should maintain an aspect ratio of 16:9. An aspect ratio of 16:9 means image is 16 units wide and 9 units tall. This is the most popular ratio that major media players like web players, TV, mobile have to properly display the video.
Why 16:9 ratio? You can upload a video that has any ratio. But when it plays in YouTube players, the video looks like the below screenshot.
Required File Formats
The thumbnail image file types that YouTube allows to upload are JPEG, .PNG, .BMP or .GIF. Normally, most of the image creating software and platforms are available.
How to Enable Custom Thumbnails Feature
Often, auto-generated thumbnails are blurry and not so pretty. If you don’t like the auto-generated thumbnails, so you can upload your custom thumbnail.
NOTE: You must have a verified account to upload a custom thumbnail to YouTube.
Here are the steps to verify your account and start uploading custom thumbnails:
Step 1: Log in to your YouTube account.
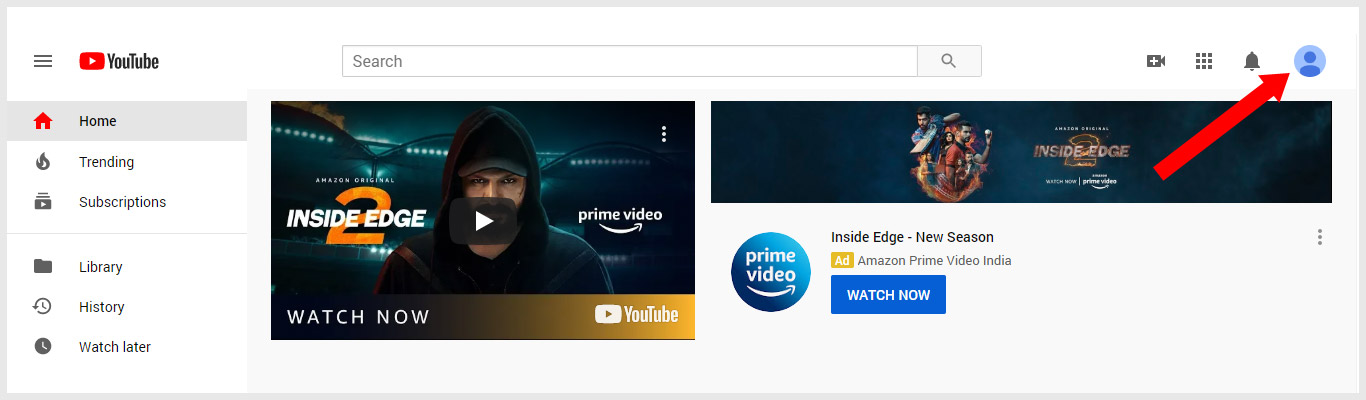
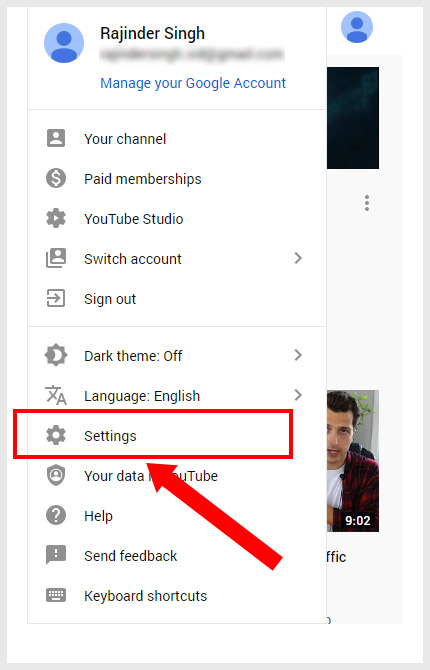
Step 2: Click on the “Profile Icon” on the top right corner to open the drop-down menu.
Step 3: In the drop-down menu, click on the “Settings“.
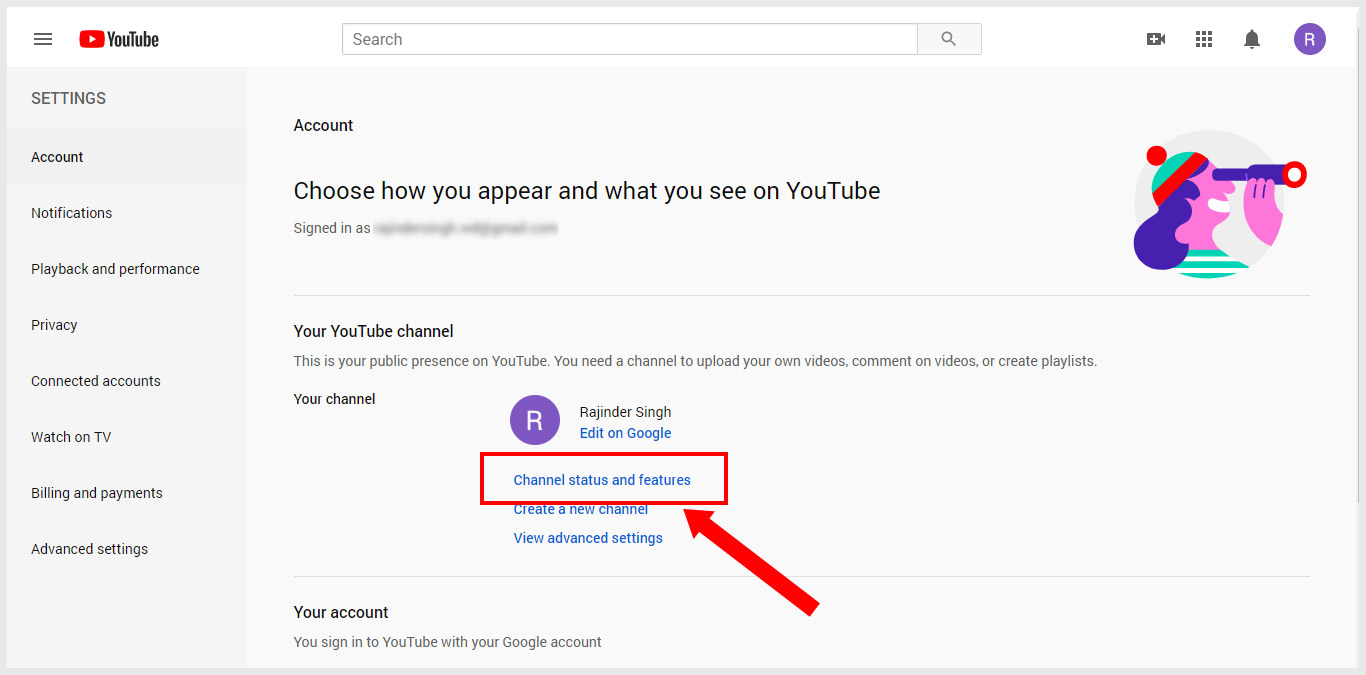
Step 4: In your account section, click on the “Channel status and features” link.
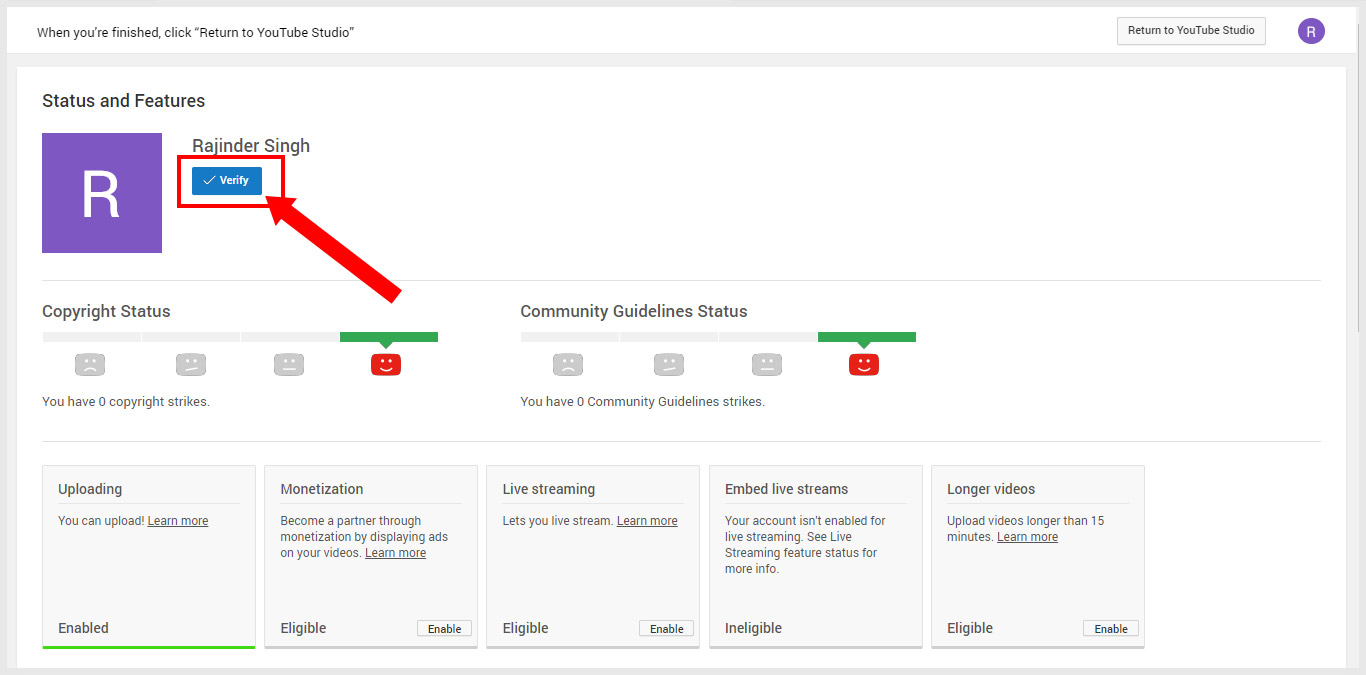
Step 5: Click on the “Verify” blue button.
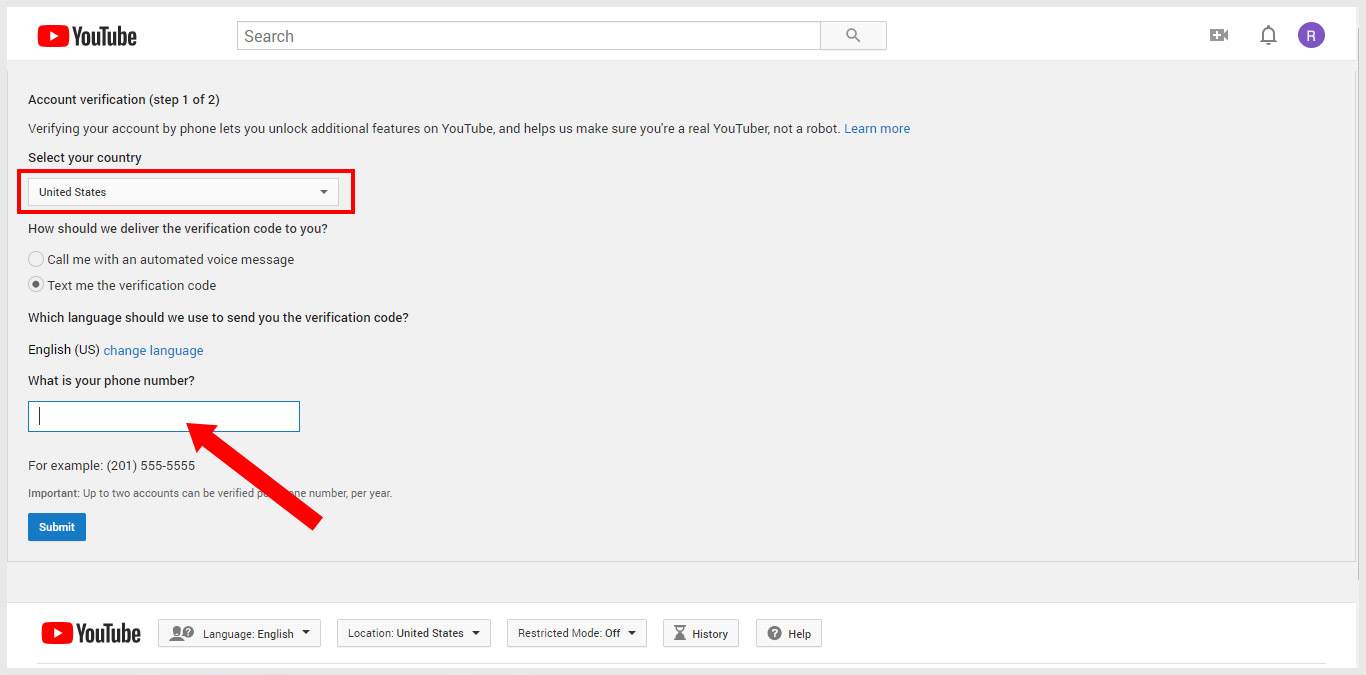
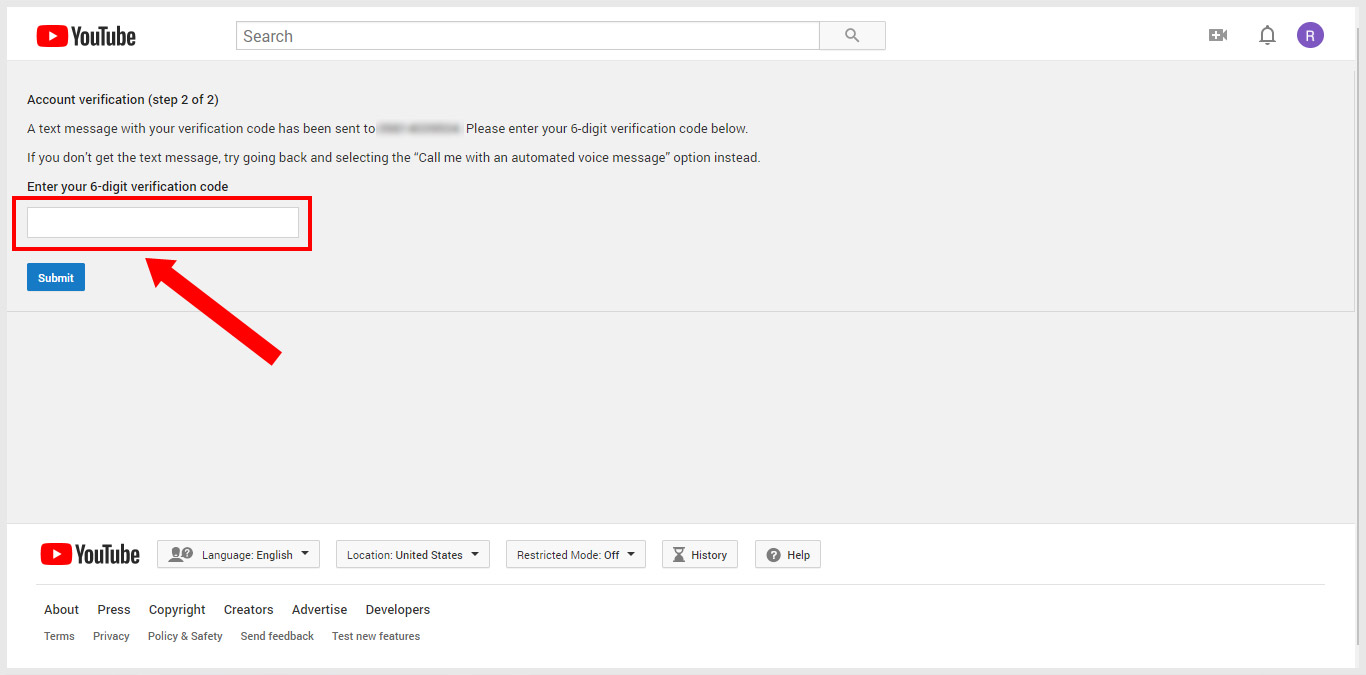
Step 6: Select your country, choose the way to receive verification code, either by call or text. Now enter your phone number (follow the example) and click the “Submit” blue button.
Step 7: Enter the 6-digit verification code.
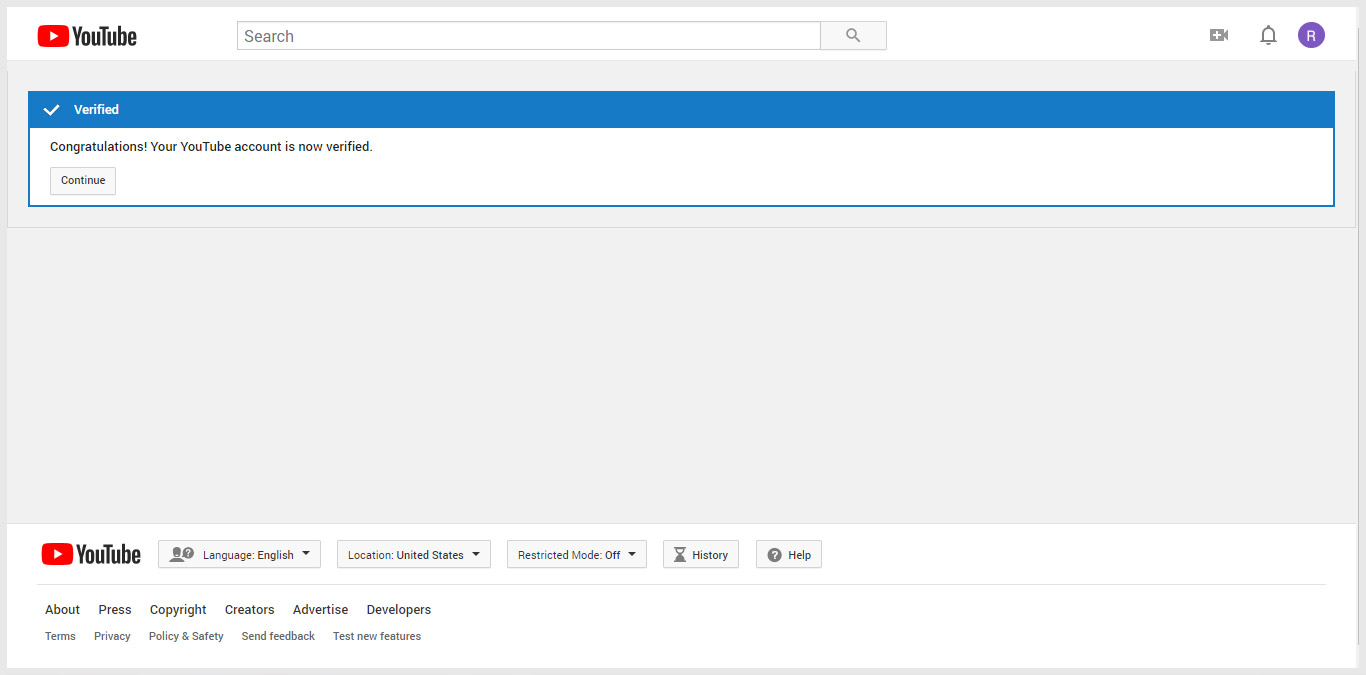
Once you submit the verification code, you will see the verified message “Congratulations! Your YouTube account is now verified.”
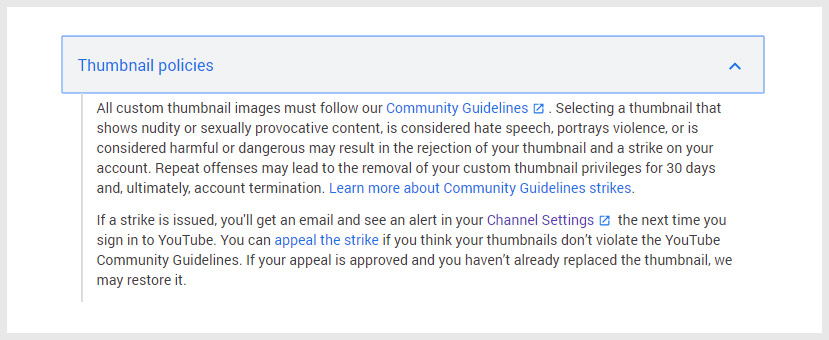
Now we have verified the YouTube account and enabled the feature to upload custom thumbnails to video. YouTube may disable custom thumbnails for certain search results when they’re considered inappropriate for viewers. All custom thumbnail images must follow our Community Guidelines.
Let’s proceed for the next step to create custom YouTube thumbnails.
How to Create Custom YouTube Thumbnails
As YouTube said, thumbnails are usually the first thing viewers see when they find one of your videos, and 90% of the best-performing videos on YouTube have custom thumbnails.
There are various ways to make custom attractive YouTube thumbnails but we will talk about four ways to make a custom YouTube thumbnail image for your videos. We’ll go through each one in detail. So let’s start with the first one:
1. Take a Screenshot of Your Video
YouTube generates thumbnails from your video and gives you 4 options to choose one but now you can upload a custom screenshot instead. Taking a screenshot from the video is one of the quickest ways to use a custom thumbnail image.
You can take a screenshot using Windows, Mac or Phone. Take the screenshot as big as your device allows you. Explore your video to get the right moment when you are in a perfect position. I’m sure you never want to show your facial expressions with closed eyes or half mouth open.
Try to take up to 10 screenshots or many more you can to get a perfect moment with nothing blurred.
Once you have a perfect screenshot, it’s time to make a perfect YouTube thumbnail size in the 1280 x 720 pixels dimensions.
Below is the example to take screenshots from YouTube videos.
2. Take Still Shots for YouTube Thumbnail
It’s a good idea to think about your thumbnail even before you shoot your video so that you’ve got several options when you upload. So use your smartphone for this method to make a custom thumbnail.
Marques Brownlee YouTube channel is a perfect example. See the screenshot given below:

Take some time to snap perfect pictures with your smartphone or camera while shooting your video for YouTube. Think when you are taking a selfie and stopping for a while to take a still shot. This will give you a perfect image for your thumbnail. Also, there is only 1% chance to get a blurry image.
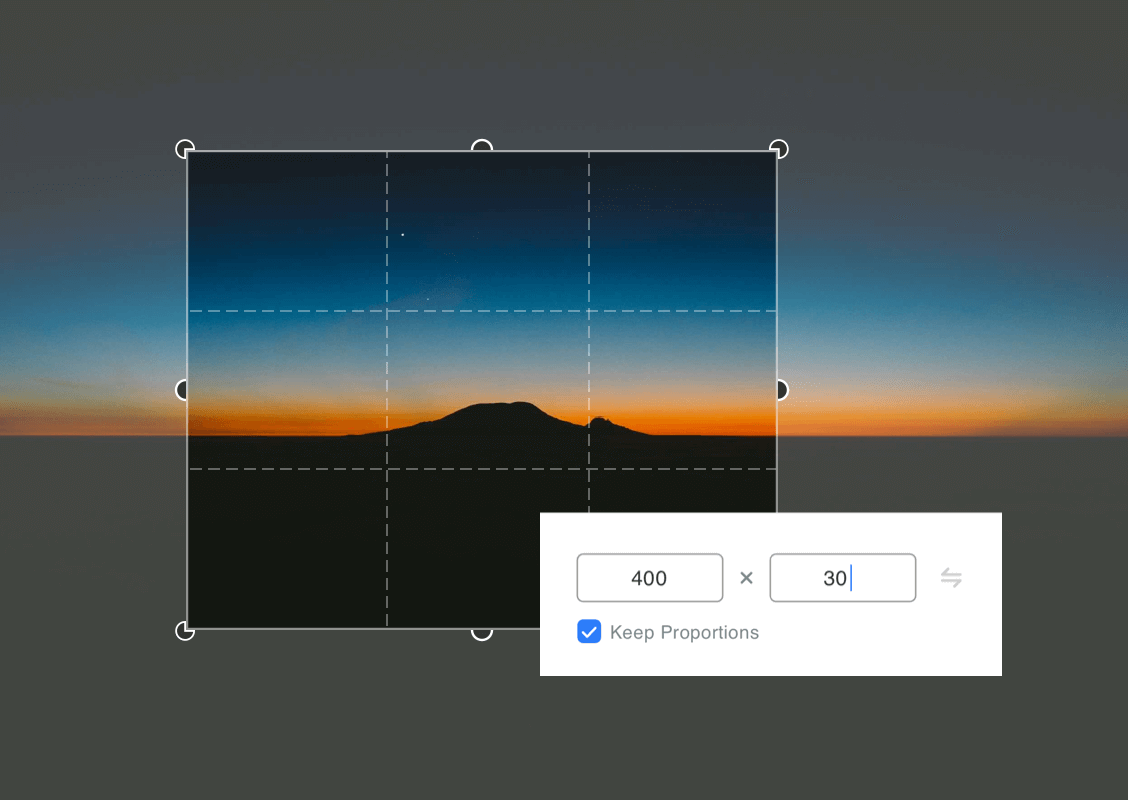
Now look at your all snapshots, do it exactly what that you are looking for? Does your snapshot accurately represent the content of your video? If yes, now crop your snap in the YouTube thumbnail size and upload it.
You can use Fotor’s Photo Cropper for cropping your snap in the accurate dimensions.
3. Use YouTube Thumbnail Maker
Thumbnail maker is another method to make YouTube thumbnails. There are more than 12 free and premium thumbnail makers are available on the web. We have a separate article on YouTube thumbnail maker, where we compared each tool’s features and prices.
All the YouTube thumbnail makers have different features, elements, graphics and ready to use thumbnail templates. I’m sure, now you have a question that who is the best thumbnail maker in the market?
We will not talk about who is best in this article because it doesn’t matter, it’s up to you how attractive or engaging you can craft thumbnails.
4. Create Your Own YouTube Thumbnail
A thumbnail is as important as video title to boost discovery on YouTube. Using an AI thumbnail maker can help you design thumbnails that accurately represent your content and enhance your video’s appeal. Use the best fonts for YouTube Thumbnail to stand out your design.
If you seriously want to grow your channel and make money on YouTube, never mislead YouTube audience. So must create the thumbnail that accurately represents the video content. Otherwise, it gives a bad impact on viewers. As a result, viewers may dislike video more than likes and never subscribe to your channel.
All custom thumbnail images must follow policies.
How to Upload a Custom Thumbnail on YouTube
By default, YouTube generates random thumbnails from your video and that looks bad. Just like you, every YouTuber wants his/her videos to get tons of views. In order to get tons of views daily, your video should have a catchy title and thumbnail.
I hope with the help of anyone method above, you have created a custom image in the recommended YouTube thumbnail size. Now, it’s time to upload it.
Uploading your thumbnail image is an easy process similar to uploading a YouTube channel art. Let’s take a look at the step-by-step process.
Make sure you already have a YouTube thumbnail size in the dimension 1280 x 720 px.
Step 1: Click on the “Edit Video” button
Log in to your account and open the video you would like to upload your custom thumbnail image and click on the “EDIT VIDOE” blue button.

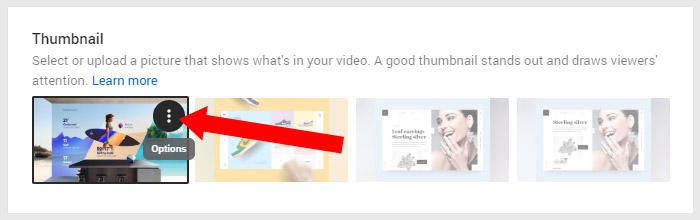
Step 2: Click on the YouTube Thumbnail “Options”
On the basic video details page you will find the auto-generated images under “Thumbnail” section. Mouse over the first thumbnail to click on the three dots tagged with “Options”.
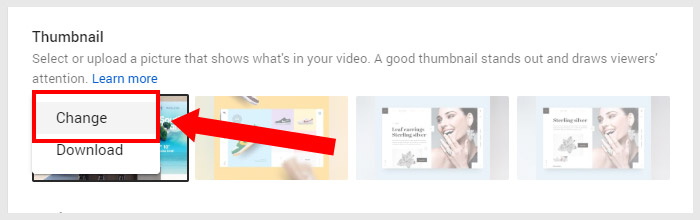
Step 3: Choose the “Change” option
Once you clicked on the three dots, you will see you have 2 options either “Change” the thumbnail or “Download” the thumbnail.
Step 4: Select your Custom Thumbnail
Click on the change option to select your custom thumbnail from your PC.
Step 5: Hit the “SAVE” button
After uploading the thumbnail, just click on the “SAVE” blue button
Now you have uploaded your own customized thumbnail. Go to your channel videos, you will see your thumbnail is live. Remember, thumbnails show up in different sizes across YouTube and external sites that embed YouTube videos, so check that your thumbnail looks good on mobile and desktop.
The above steps are available in YouTube’s newer version. If you will face any issue in uploading your thumbnail, you can learn more on YouTube Help.